

Appearance
Installation
For merchants
This guide takes you from download to a test order, one click at a time. You don't need to know Shopware: every step says where to click and shows a screenshot, with the button to press outlined in red. Plan about 20 minutes.
Before you start
You need:
- Your Shopware Administration login. The Administration is your shop's back office. Open it by adding
/adminto your shop's address, for examplehttps://myshop.com/admin. Your shop must run Shopware 6.7. - A Shipbubble account at app.shipbubble.com and its sandbox API key. You find the key in the Shipbubble dashboard under Settings → API keys & webhooks. It starts with
sb_sandbox_. With the sandbox key no real courier is booked, so you can test safely. - Naira. Shipbubble prices deliveries in Nigerian naira (NGN), so your shop has to offer NGN. Step 9 shows where to check this.
For whoever hosts your shop
The plugin needs PHP 8.2 or newer and MySQL 8.0+ or MariaDB 10.11+. Shipbubble sends delivery updates to your shop, so the shop must be reachable on a public domain, and Shopware's message queue worker must be running (bin/console messenger:consume). Take a database backup before installing: the plugin creates tables, a shipping method, flows and mail templates. Developers can install with Composer instead of the ZIP — see Install with Composer.
Step 1: Download the plugin
Download KmhShipbubbleSW.zip (always the latest version; the release page lists what changed). Save it on your computer and don't unzip it: Shopware needs the ZIP file as it is.
The plugin is free and open source (Apache-2.0).
Step 2: Log in to the Administration
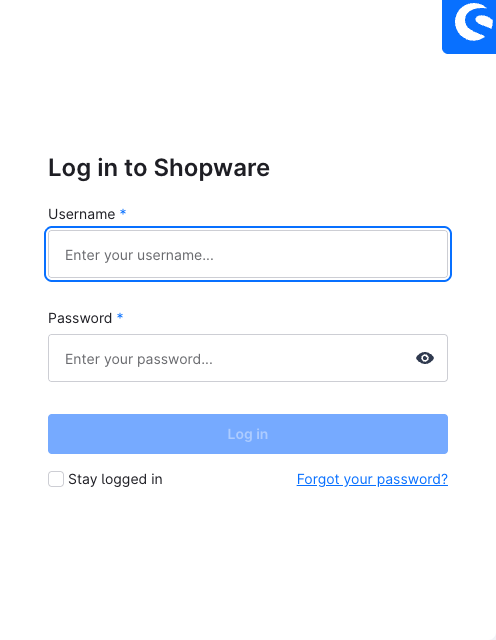
Open https://<your-shop>/admin and log in with your username and password.
Step 3: Open My extensions
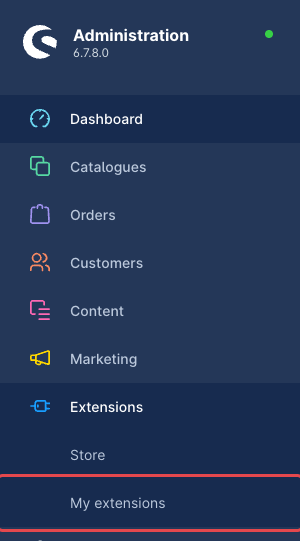
In the menu on the left, click Extensions, then My extensions.
Step 4: Upload the ZIP file
Click Upload extension at the top right and choose the KmhShipbubbleSW.zip you downloaded.
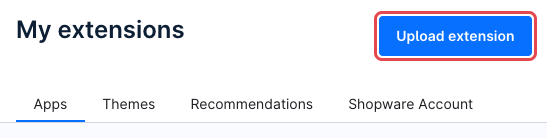
After a few seconds Shipbubble appears in the list.
Step 5: Install and switch it on
On the Shipbubble row, click Install.

When the installation has finished, the switch on the left of the row is blue: the plugin is on. If it is grey, click it once. Then click Configure.

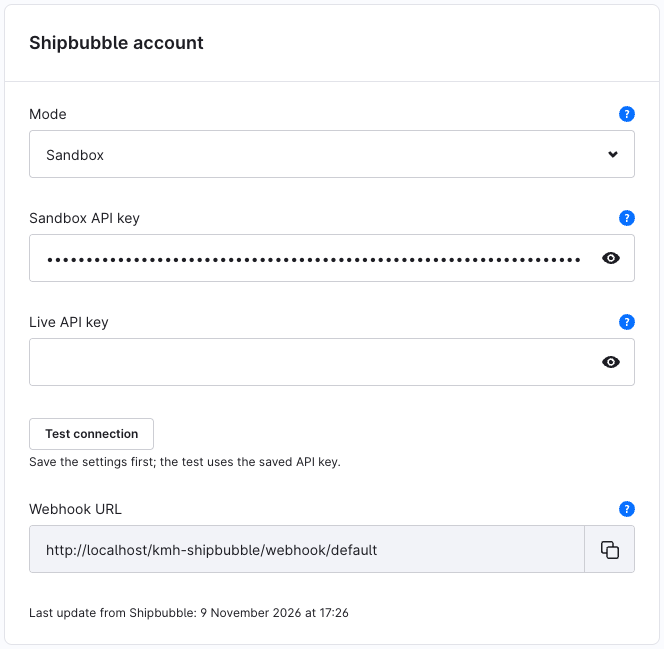
Step 6: Connect your Shipbubble account
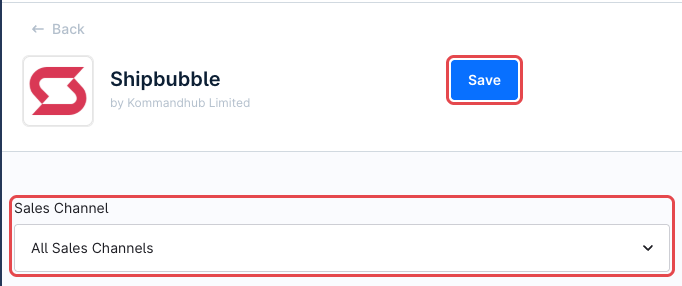
Configure opens the plugin's settings. Leave Sales Channel on All Sales Channels: the settings then apply to your whole shop. The Save button is at the top right; you'll use it after every change.
In the Shipbubble account card:
- Mode: keep Sandbox.
- Sandbox API key: paste your key (
sb_sandbox_…). - Click Save at the top.
- Click Test connection. A green message confirms the connection and shows your Shipbubble wallet balance.
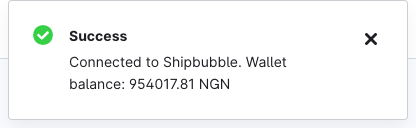
If you see a red message instead, the key is wrong or belongs to the other mode; Shipbubble's own explanation is in the message.
Under the button you see the Webhook URL. Copy it (click the copy icon) and paste it into the Shipbubble dashboard under Settings → API keys & webhooks, as both Test webhook url and Live webhook url. Shipbubble uses it to tell your shop when a parcel is picked up or delivered.
Step 7: Enter your pickup address
Scroll down to Sender (pickup address): the address where couriers collect your parcels. Fill in name, phone, email, street, city and state (country code NG), click Save, then click Validate sender address.
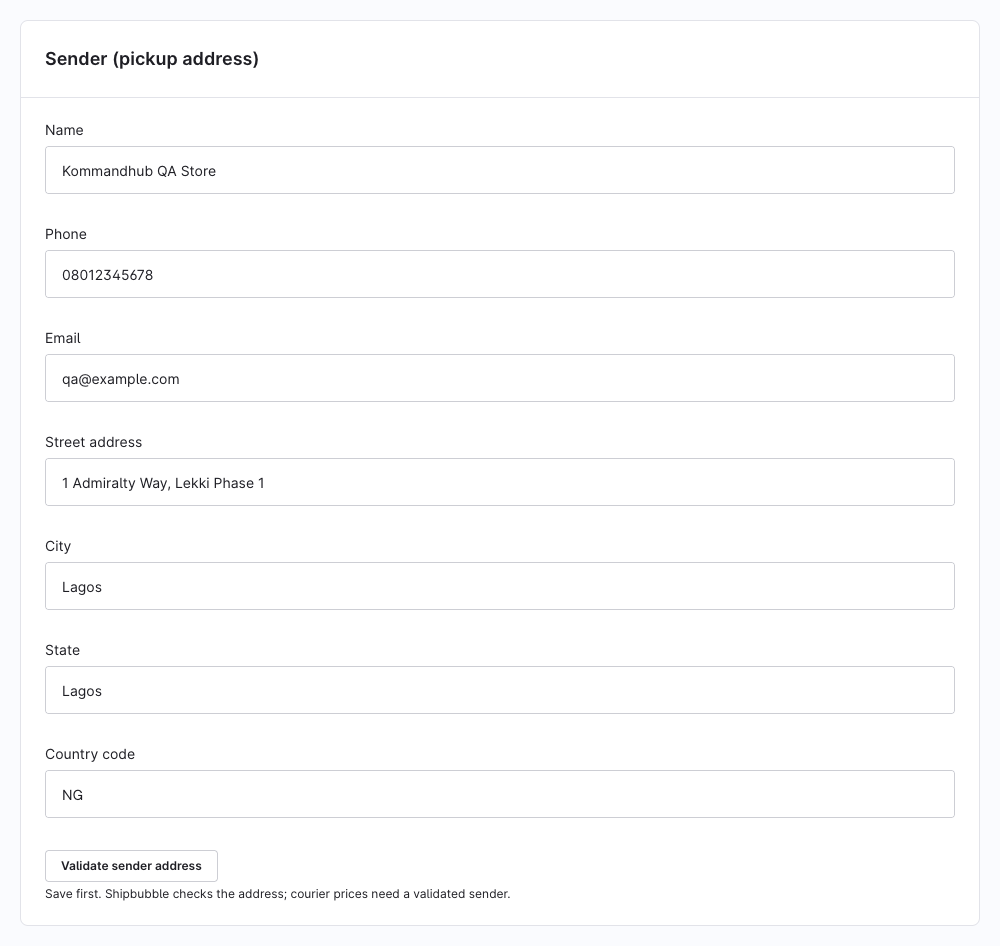
Shipbubble checks the address and the page confirms "Sender address validated". Courier prices only appear at checkout after this step.
The remaining cards (couriers, package size, markup) have sensible defaults. You can adjust them later; every setting is explained in Configuration.
Step 8: Switch on courier delivery
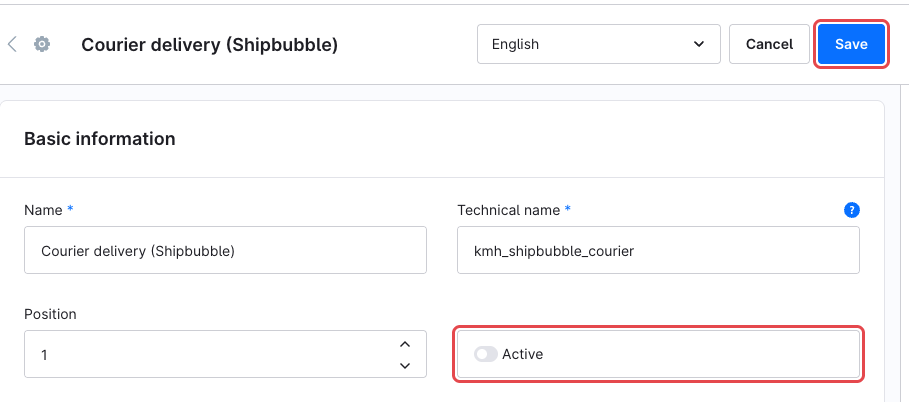
The plugin adds the shipping method Courier delivery (Shipbubble), switched off so customers don't see it before you've set it up. Switch it on now:
In the left menu click Settings, then Shipping (under Commerce).
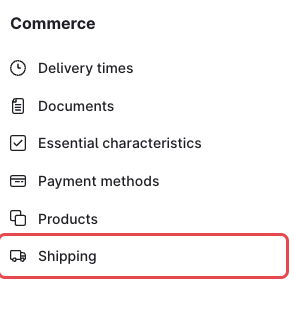
Click Courier delivery (Shipbubble).

Switch Active on and click Save.
Keep your other shipping methods
Don't make Shipbubble your only shipping method. When Shipbubble can't price an address, customers need another option.
Step 9: Check your sales channel
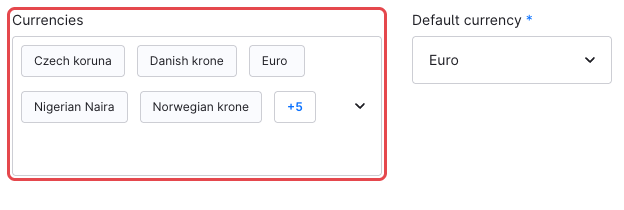
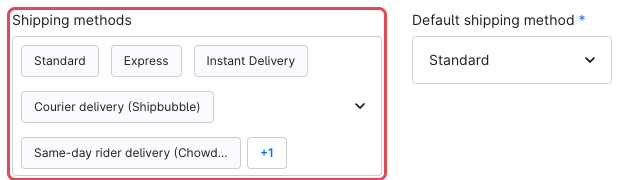
A sales channel is your storefront. In the left menu under Sales Channels, click your shop and look at the General tab:
Currencies must include Nigerian Naira. If it's missing, click the field and add it, then Save.
Shipping methods must include Courier delivery (Shipbubble). The plugin adds it to every sales channel; remove it from storefronts that don't sell in naira.
Step 10: Ask customers for a phone number
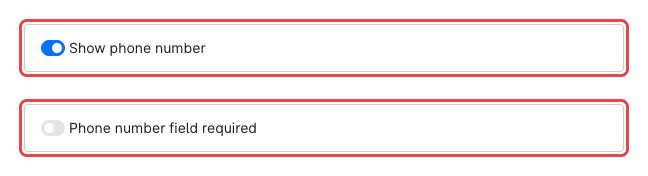
Couriers call the customer at delivery, so Shipbubble needs a phone number with every address. Open Settings → Log-in & sign-up (under Customer), switch on Show phone number and Phone number field required, and click Save.
Step 11: Place a test order
Open your storefront, switch the currency to NGN, add a product to the cart and go to checkout with a Nigerian address and phone number.
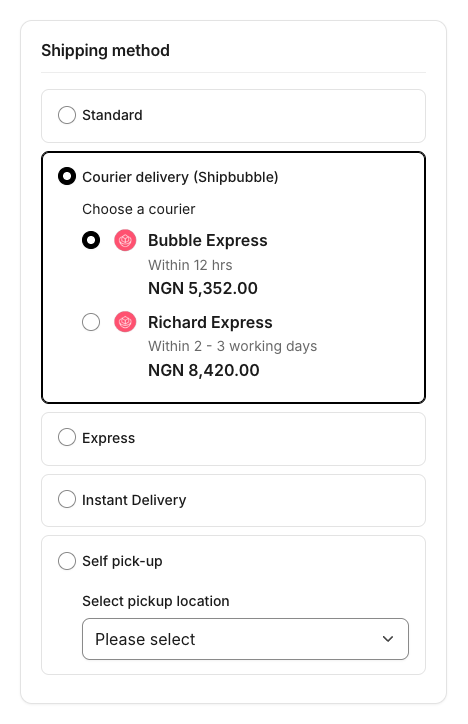
Under Shipping method, choose Courier delivery (Shipbubble). The couriers appear with their prices.
Place the order.
Back in the Administration, open Orders, click the order and set Payment status to Paid. When an order is paid, the plugin books the courier automatically.

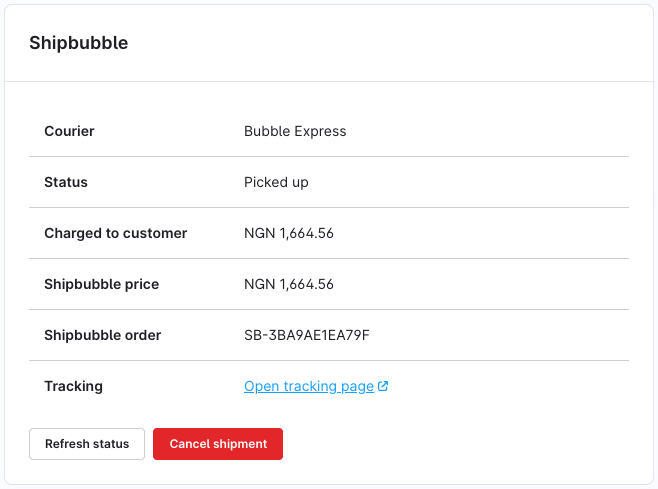
Reload the order. The Shipbubble card on the General tab shows the courier, the status, the Shipbubble order and the tracking link, and the customer receives a tracking email.
That's it: Shipbubble works on your shop. What happens next with each order is explained in Shipments & flows. If a step didn't work, see Troubleshooting.
Go live
When your tests work:
- Get your Shipbubble account verified, then fund your Shipbubble wallet. Shipbubble doesn't accept funding before verification. Courier bookings are paid from this wallet, and so is each check of a new customer address (₦5 after the first 50 free).
- In the plugin settings, paste your Live API key (
sb_prod_…), set Mode to Live, click Save and then Test connection. - Click Validate sender address again: sandbox and live keep separate address checks.
- Make sure the Live webhook url in the Shipbubble dashboard is the URL from the settings page.
- Place and pay a small real order.
Permissions
Staff who aren't administrators need the order permission Shipbubble shipments in their role (Settings → Users & permissions → Roles, under Orders): Viewer to see the Shipbubble card, Editor to create, refresh and cancel shipments. See Shopware: Users & permissions.
Updating
Download the new KmhShipbubbleSW.zip and upload it the same way as in Step 4. Shopware then offers Update on the Shipbubble row; click it.
Updates leave flows you edited or switched off alone, and never change your shipping method. A flow you deleted is created again on the next update, so switch a flow off instead of deleting it.
Switching the plugin off
On the Shipbubble row in My extensions, click the switch so it turns grey. This also switches Courier delivery (Shipbubble) off; everything else stays.
Switching the plugin back on does not switch the shipping method back on, so customers don't suddenly see it. Turn it on yourself as in Step 8.
Uninstalling
In My extensions, click ⋯ on the Shipbubble row, then Uninstall.
- The shipping method is switched off, never deleted: your orders refer to it.
- With keep user data, everything stays.
- Without keep user data, the plugin's shipment, address and webhook data, the stored sender address codes, its flows and their mail templates are removed — including your own flows that use a Shipbubble trigger or the Create Shipbubble shipment action. Orders and their tracking codes are kept.
Install with Composer
For developers. From the Shopware project root:
bash
composer require kommandhub/shipbubble-sw
bin/console plugin:refresh
bin/console plugin:install --activate KmhShipbubbleSW
bin/console cache:clear
The package is kommandhub/shipbubble-sw on Packagist; no licence key or token. Update with composer update kommandhub/shipbubble-sw, then bin/console plugin:update KmhShipbubbleSW and bin/console cache:clear. Background: Shopware: extension management. The source is public at github.com/KommandHub-Org/KmhShipbubbleSW.
What installation creates
| What | Details |
|---|---|
| Shipping method Courier delivery (Shipbubble) | technical name kmh_shipbubble_courier, inactive, linked to every sales channel, tracking URL https://trackshipment.shipbubble.com/shipment/%s. The price is calculated at checkout. |
| Flows (active) | Shipbubble: create shipment when paid, tracking email to customer, booking failed alert, delivered email to customer, parcel returned alert — see Shipments & flows |
| Mail templates | Shipbubble: shipment created, booking failed, shipment delivered, parcel returned — English and German |
| Tables | kmh_shipbubble_shipment (one row per Shipbubble delivery), kmh_shipbubble_address (validated customer addresses) and kmh_shipbubble_webhook_event (received webhooks) |
| Scheduled task | kmh_shipbubble.webhook_event_cleanup — daily, deletes stored webhook events older than 90 days |
| Administration | A Shipbubble card on the order's General tab, and the order permission Shipbubble shipments |
The plugin creates the shipping method once and never changes it again (except adding the Shipbubble tracking link when that field is empty), so renaming it, changing its sales channels or its availability rule is safe.